Interface Guide
This page guides offers resources to navigate AdaCAD interface and learn about the various features that are available.
- AdaCAD 4
- AdaCAD 3
We created the following video to introduce you to the interface for AdaCAD 4:

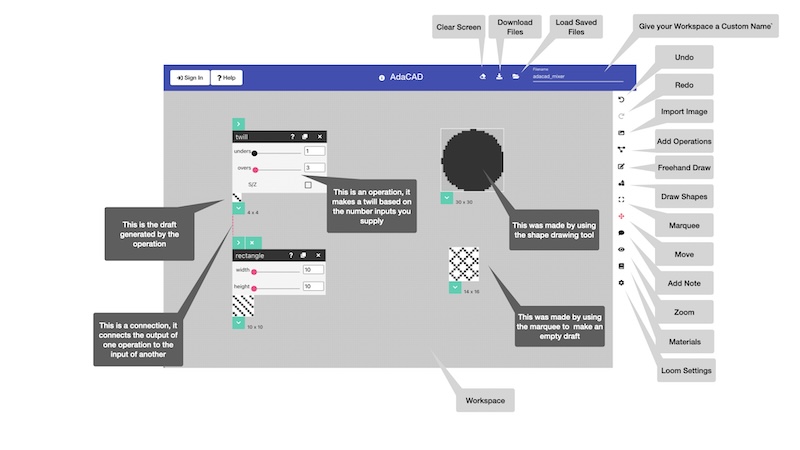
The image above is a labeled guide to the AdaCAD interface (which has the buttons you need to push create drafts as listed above). On the top bar, there are links allowing you to:
- Sign in: Signing in with a google account will automatically save your work so that you can recover it if something unexpected happens in your web browser. We collect only your google email and name, and do not share it.
- Get Help: Links to this page
- Learn About AdaCAD: Contains information about AdaCAD's version and how to report errors
- Clear Screen: starts a new blank workspace
- Save/Download Workspace: download to your computer so you can load it back later
- Load Workspace: allows you to load an example file or a .ada file from your computer
- Name Workspace: you can give your workspace a name, which will be the filename when it saves
On the right-hand sidebar you can:
- Undo: you can undo up to 10 previous changes
- Redo: you can redo up to your 10 next changes
- Add an Image: No longer used, adding an image is an operation now
- Add an Operation to the Workspace: opens a panel where you can select the operation you want to add to the workspace
- Draw Line: allows you to draw lines freehand on the workspace
- Draw Shape: allows you to draw shapes freehand on the workspace
- Select: selects a portion of a draft from the workspace and copies it in a new draft
- Move: allows you to move the position of the drafts and operations on the workspace
- Comment: allows you to add a text comment and place it on the workspace
- View Options: opens a window that allows you to zoom in and out of your workspace
- Add/Edit Materials: opens a window that contains a list of materials that you're workspace can use
- Loom Settings: opens a window that customizes the interface based on the type of loom you have. For example, you'll only get options to design for threading, tieup, and treadling if you are set the mode to shaft loom
When you add operations and drafts to the workspace, and connect them together to create new drafts. On those new drafts you have a few options. These become visible when you hover your mouse over a draft:
- Expand into Fine Tune Mode: you can expand into fine-tune mode, which gives you more options for editing and viewing details on an individual draft
- Show/Hide: reveals or hides the draft (to save space on the interface)
- Copy: copies the draft into a new draft, without an operation parent, so that you can make edits or changes outline of the operation-draft-workflow
- Download: downloads the draft as a bitmap or image. You can use this to export structures which you may later import into Photoshop.
- Connect: clicking the downward arrow at the bottom of the draft lets you add it as an input to an operation. A single draft can be connected to multiple operations.
Operations also have a few options
- Connect: the top, right-facing arrow can be clicked to select this operation as a destination for a previously selected draft. When drafts are connected to an operation, their name appears to the right of this arrow. You can use this to either see what you've connected or remove a connection.
- Help (?): Opens a window that tells you more about the operation and how it works
- Copy: copies this operation (and its parameters) and pastes it onto the workspace
- Delete: deletes the operation and any immediately connected drafts and connections
- Parameters: most operations have parameters (numbers, text, check boxes) that let you give them some information about how they should behave. Just play with these to see how they work :)

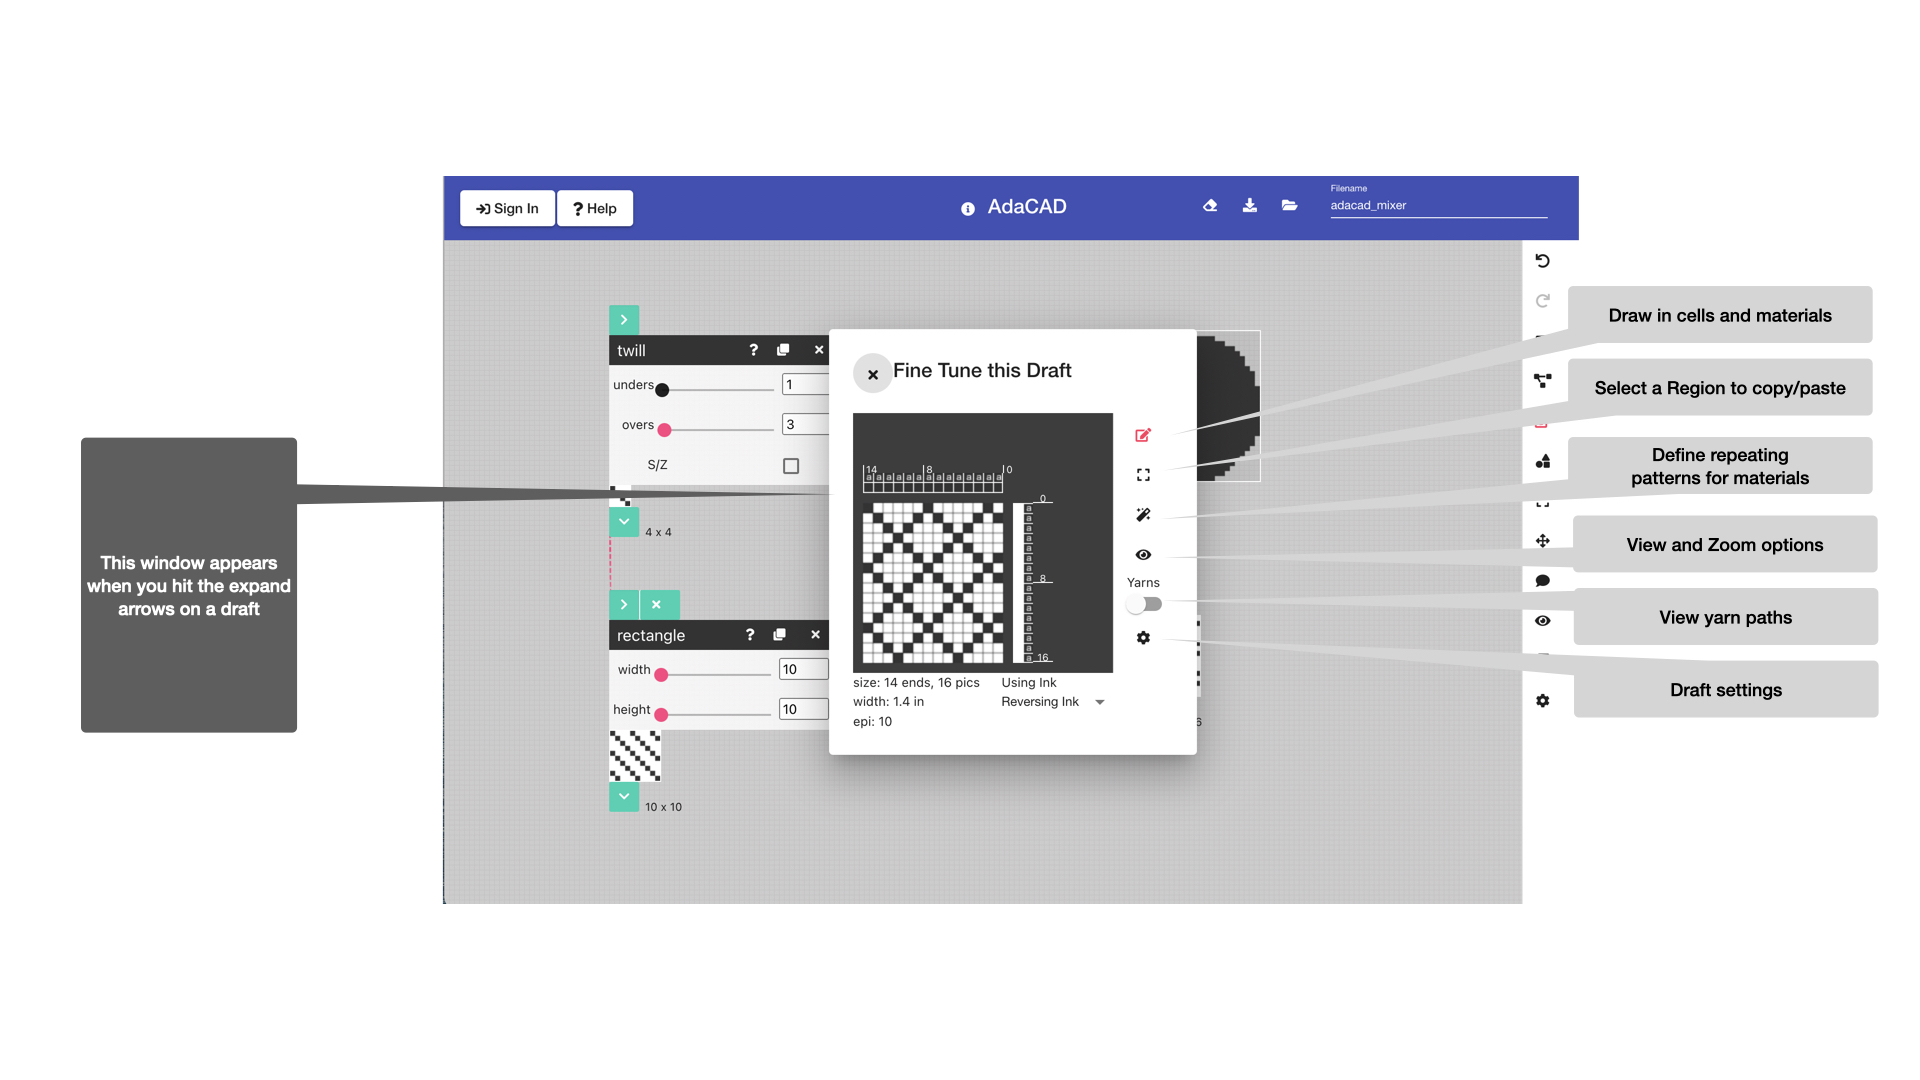
A labeled guide to the fine-tuning interface. When you add drafts and operations to the workspace, you can expand the to enter "fine tuning" mode, which allows you see more details about an individual draft. There is a sidebar on this window that offers you controls to
- Draw: change the value (up,down, unset) of each draft cell. Black represents heddle up, white heddle down, Unset cells mean that a yarn will not travel over this warp and can be useful when shape weaving or integrating inlays in portions of the draft.
- Copy/Modify: allows you to select a section of the input draft and perform some operations (invert, flip,etc) on it
- Repeats: allows you to set repeating color or system patterns on the warp and weft.
- Zoom: allows you to customize the zoom and/or other options for visualizing your draft
- Yarn Paths: allows you to toggle between seeing your draft as a draft vs. a very rough simulation of how the yarns will move through the draft.
- Draft Settings: allows you to specify details about this draft, such as how many warps and wefts it has.
These videos show you how to get started in AdaCAD 3.0. The interface in these videos is a bit outdated, but the features and workflow remain mostly the same!
Part 1:
Part 2: