Generating Threading Sequences
Generate a workflow that produces a threading, treadling and tie-up based on unit blocks.
Prefer learning by video? Watch a recording of our Drafting for Harness and Dobby virtual workshop.
Operations Explored
pattern across width rotate make drawdown from threading, tieup, and treadlingWhat You'll Need
- A Pen and Pencil (optional)
- A blank workspace at adacad.org.
Process
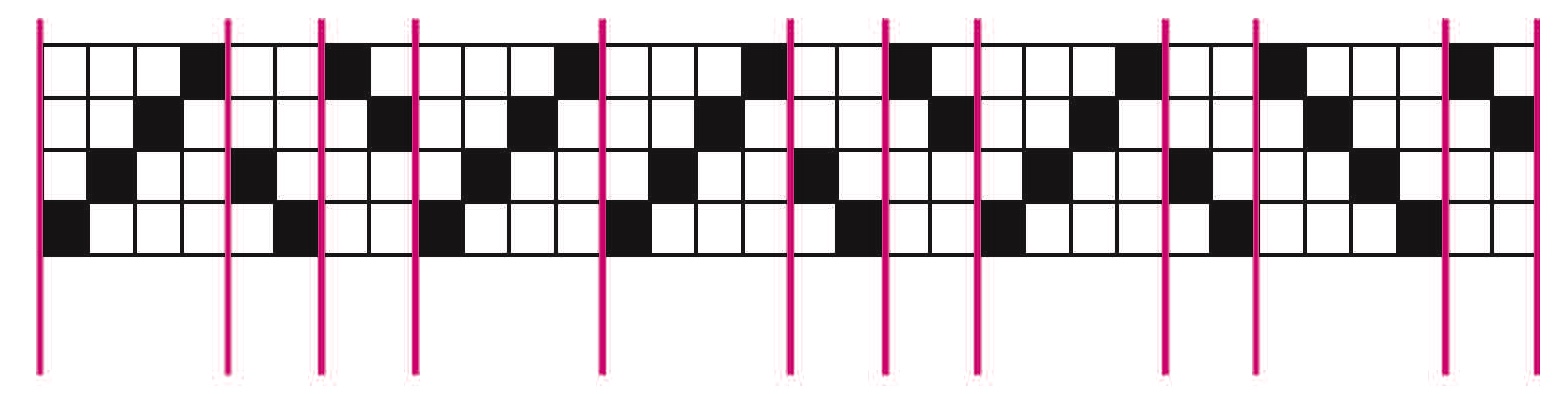
- The diagram below shows a threading split into different blocks. Assign each unique block a letter and write it in the corresponding space below the block. If the block repeats, assign repeated block the letter of the block it repeats. The "correct" answer for this sequence is at the bottom of this section.
-
We're going to start by adding the unit blocks we identified in the threading above to our workspace. To start, click + add draft from the left side menu in the AdaCAD workspace view. When prompted to enter the number of warps and wefts, entire 4 warps and 4 wefts, then hit Ok. You should now see an empty 4x4 draft on the workspace. Click the cells in the drawdown to change their value, and so the draft looks like the unit you identified as
ain the diagram above. Repeat this process for blocksb,candd, making sure that the number of wefts and warps match the number in the respective block. -
Select or search for the pattern across width operation from the list of operations on the left sidebar. If it is not showing up, make sure "Show Advanced Operations" is selected. After you select the operation, it will be added into your workspace. This operation has one
parameterwhich takes a series of letters, separated by spaces. In that space, type our correct letter sequence:a b c a a b c a b d cand hit the button to update the operations inlets. You should now see one inlet for each of the letters in your string below. -
Connect/click the outlet from the draft you created as
ato the inlet labeleda. Repeat this process for drafts and inletsb,c, andd. Each time you connect a draft to an inlet you'll see the the pattern across width operation adds the drafts in the order of the letter sequence, as though each draft as a stamp and it was adding a stamp each time it reached the corresponding letter. After connecting all of the drafts to the operation, the draft created by pattern across width should look like the diagram above. Feel free to stop and play here by either changing the unit drafts or changing the letter sequence and hitting the button. What we have made here is a draft that will represent the threading of our harness loom. Now, lets make a tieup and treadling. -
To make a tie-up, add another empty draft using the same process as we did in 1. Specifically, click + add draft from the left side menu in the AdaCAD workspace view. When prompted to enter the number of warps and wefts, entire 4 warps and 4 wefts, then hit Ok. We'll use the empty 4x4 draft created on the workspace as a tieup, so go ahead and click in a few cells to describe the kind of tieup you might want to use.
-
To make the treadling, we're going to cheat a little. While we could repeat the process of steps 3 and 4 with pattern across length instead, we're going to assume here that we'll weave "as drawn in" with the treadling mirroring the threading. To do this, we'll simply select or search for the rotate operation to add it to our workspace. Connect/click the outlet from the draft created by pattern across width and then click/connect it to the draft inlet on the rotate operation. Change the amount parameter on the operation to '90' to create a new draft that represents the threading, rotated by 90 degrees.
-
To preview what kind of drawdown will be created by this threading, tieup and treadling, we're going to select or search for the make drawdown from threading, tieup, and treadling operation. Connect the outlet attached to the draft created by pattern across width to the inlet labeled threading, the outlet attached to the draft created by rotate to the inlet labeled treadling, and the outlet on the 4x4 draft you created to represent the tieup to the inlet labeled tieup. Now, you'll see a new draft created by make drawdown from threading, tieup, and treadling that represents the structure of your cloth.
-
Next steps: watch how the drawdown changes when you change the tieup by clicking on the cells in your tieup draft or when you change letter sequence in pattern across width. You can also adjust the threading to match the number of ends in your loom by changing letter sequence in pattern across width or changing the width of the individual unit drafts. You can change the unit drafts to match the number of frames on your loom by double clicking a unit draft (for example, the drafts you created to represent a, b, c, and d), and then selecting
open in editor. In the draft mode, you can change the number of wefts in the draft in the left sidebar. You can open your threading draft in draft mode following the same process and fine-tune the threading the dataflow generated. Keep in mind, when you make these edits the draft you edit will no longer be affected by the dataflow.
The correct letter sequence in the diagram above is: a b c a a b c a b d c